This is the second episode of our series on niche validation. You might want to read part one and three to get the whole picture.
I've spent the last 2 months speaking to successful ecommerce entrepreneurs on my podcast, Shopify Masters, and one of the most common mistakes entrepreneurs regret making is that they started off with too many products. One of my guests, Morgen Newman from MixedMade (click here to listen to his story of launching an ecommerce store that generates revenue in 30 days), spoke about a valuable lesson a seasoned entrepreneur taught him. The entrepreneur told him “when you go from 1 product to 2 products, you doubled the amount of work and risk.”
Picking the right products can double your average order size
Start off with the least number of products possible and then add products as you gain more experience with running a store and have a better understanding of your customer. If you're working with a limited budget you don't want to spread your advertising across too many products when you don't really know which ads are working, yet.
However, that doesn't mean you should always only launch with 1 product. Sometimes you can find multiple products that complement each other so well that you can double or triple your average order size per customer. The idea is to launch with the minimum number of products possible so that you can maximize your sales, but not overwhelm yourself.
For example, I recently interviewed DronesEtc.com founder, Shawn Rowland. His store sells aerial photography drones to hobbyists and professional photographers.
Shawn found that customers often purchased complementary products from his store even though his add-on products were more expensive than his competitors because he stocked exactly what his customers wanted and his customers rather get everything in one shot and one order than to shop around to piece together a package.
Click here to listen to Shawn Rowland's story about how he went from $200K+ in debt and how his co-founder had to re-mortgage his home to build a $600K/month company in less than a year.
Test which products to add to your store
If you already have a store, here's a step-by-step way to test if a product is worth adding to your catalog.
If you don't have a store yet, but you have a blog or website, you can use this technique to see if there's any demand for products before you go through all the work of opening a store.
Why not just add the product and see if people buy it? That makes sense if you know exactly what your customer wants and don't ever plan on offering more than a few products, but if you want to take a data-driven approach to building your store and want to test and see which products your customer wants, I'll show you a scalable way to do just that.
This tactic requires a few things:
- Hello Bar
- Some traffic to your site or store
- A landing page with more details about the product you are validating (this can be a product page or a blog post)
How Hello Bar works
Hello Bar is a well-designed and highly-optimized bar that spans across the top of your website and does an amazing job of grabbing the visitor's attention without being obtrusive. It's almost as effective (and in some cases, more effective than) a pop-up in grabbing attention, but is not nearly as obtrusive as a pop-up because it doesn't stop the visitor from browsing your site. See for yourself: I have the bar set up on top of my site, Shopify Masters, for people to sign up to get my weekly ecommerce entrepreneur tips.
You can use Hello Bar to validate a product by asking every site visitor if they are interested in the product. If the visitor wants to learn more or wants to buy, they can click through to the landing page (this is the product page or the blog post you will write) to learn more.
You can gauge interest in the product by seeing how much traffic clicks through to the landing page.
This is the flow from the visitor's perspective:
- Visitor visits your site
- Sees Hello Bar about the product you're validating
- Visitor is interested in learning more
- Visitor clicks on the Hello Bar button taking them to the page you will create
- On the new page, the visitor learns more about the product
- Visitor can then sign up to be notified when the product is available or can pre-order the product
The easiest way to validate is by tracking how many visitors click through to the new page. If you want even stronger validation, you can measure how many people enter their email address to be notified when the product is available and of course the strongest form of validation is pre-selling the product to the visitor.
Each stage requires a bit more work. I would suggest starting off with validating how many people are clicking through to the page. If the clickthrough rate (I'll show you how to get the clickthrough rate in a bit) looks good to you (5% or greater) then start adding more levels of commitment like an email sign up form and then eventually pre-selling. If you want to learn more about pre-selling, listen to Andrew Gardner's story about how he pre-sold $800,000 “Polar Pens” even before he had one item in stock.
At the end of this post is a free resource that you don't want to miss. You will get a FREE Training Video showing you exactly how to validate your niche using Hello Bar.
So now here's how you set everything up, step by step:
How to use Hello Bar to validate your store
Step #1:
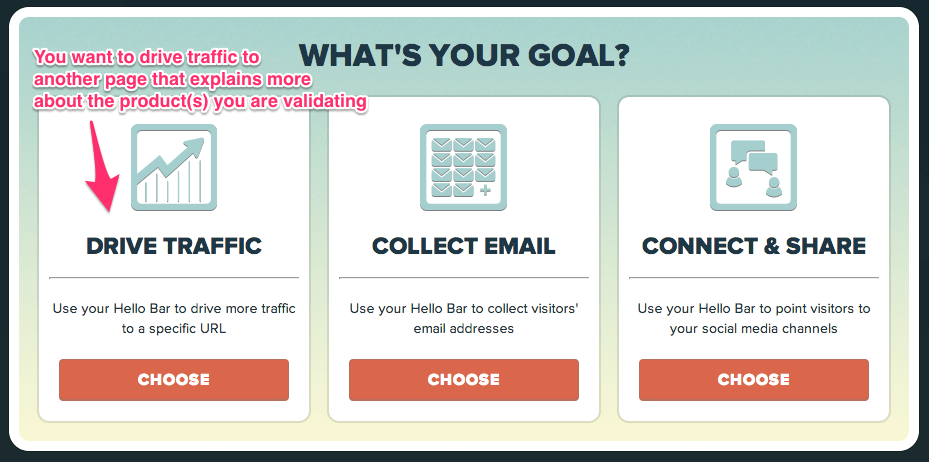
Sign up for Hello Bar and then select the “DRIVE TRAFFIC” goal.
“COLLECT EMAIL” isn't that useful for validation because visitors are going to want to learn more about the product before signing up and you don't have enough room in the Hello Bar to explain and describe the product — instead we'll give visitors an idea of the product and tease them to click on the button to go to the landing page where we'll explain the product and then ask for their email address
“CONNECT & SHARE” drives visitors to your Twitter or Facebook accounts. So is also not useful for validation.

Step #2:
Create a page that has more information about the product. If you want to get even stronger validation, you can set up a mailing list sign up form or even take pre-orders on this page.

The larger the commitment you ask from your visitor, the more confident you can feel with the validation data. Here's a scale of commitment and the “cost” to the visitor:
- Clicking on a button to learn more about a product – costs the visitor 30 seconds of their time
- Asking the visitor for their email address – the visitor is trusting that you won't spam them
- Asking the visitor for their credit card – costs the visitor money
If the commitment is large, the visitor's desire for the product must also be great. So if you can get a lot of people to make large commitments, you can feel confident that there is a lot of demand for your product.
If you collect credit cards and end up charging users for pre-orders and don't end up making enough money to justify opening up a store or stocking the product, you can always refund customers — although not ideal, this happens all the time for Kickstarter campaigns.
Step #3:
Now you want to write the text that goes in to the Hello Bar. You do not have much room, but you do not need much. Your text can do 1 of the following:
- Tell what the product is
- or ask a question
You want to just explain briefly what the new product is. You don't want to pitch or try to sell them on the product here because you are only validating and pitching/selling can skew your data.

If you can't come up with a short explanation, just go with the name of the product. Here's an example of a carolinasitalianrestaurant.com that is selling gift cards on their site:

Consider asking a question to your visitor, too. Kimberlysnyder.net takes this approach. Kimberly actually does have a product to sell once you click through and 20% of her revenues come from the Hello Bar:

Step #4:
Add Hello Bar to your site.

If your site is on WordPress you can download the plugin which is already personalized for your specific Hello Bar account so once the plugin is activated it will display the Hello Bar you just made.
If you are not on WordPress, click on the “I can install code myself” and you will need to copy and paste the code right before the closing </body> tag on every page you want the bar to appear. If you have Google Analytics set up, I recommend placing the Hello Bar on a few of your highest volume pages.
Once you've identified the pages, just open up the HTML file and add Hello Bar by CMD + F for the Mac or CTRL + F for the PC and search for “</body>” and drop the line of code right before the </body> tag.
Once you get to this stage, Hello Bar does a good job of giving you step by step how to install the Hello Bar either by installing code or through the WordPress plugin.
If you don't feel comfortable doing either, you can hire someone on Freelancer.com to do it. It's a very quick update and should cost you no more than $20. Just use this template in your Elance or oDesk job posting:
- If you are not using WordPress: “I need a developer to add one snippet of code from HelloBar.com before the closing </body> tag of a few pages on my website”
- If you are using WordPress: “I need a developer to install the HelloBar.com WordPress plugin”
Step #5:
After a few weeks, you will be able to take a look at the data whether that be landing page visits, email sign ups or preorders.
Hello Bar will show you how many people were shown the Hello Bar and how many people clicked through.
This tactic only takes 30 minutes to set up and should cost you no more than $20 (free if you can install the Hello Bar yourself) and you can use it repeatedly to test if you should be adding new products to your site.
How to do your first niche validation using Hello Bar
If you're the type of learner that likes to see it done once before you can do it yourself, I put together a free training video for you. I walk through how I set up Hello Bar on my site live. Click here to get your free training video of me walking through all 5 steps live.


I think having a mailing list sign up form or a pre-order form on that page is a good idea because once a person knows more about you, chances are they will want to try out your product(s). I have heard about the Hello Bar but never actually gave it a second thought, but as you presented it here it does look very useful in getting people to trust you and maybe buy from you.